A QUIC Chat
Most of the backend applications I work on talk to other systems, like a backend (micro)service, another application, or a database. More often than not, they use an existing application protocol, such as HTTP, SMTP, or AMQP, that sits on top of TCP, a good old transport protocol. Recently, though, a new transport protocol appeared in the wild, QUIC.
Initially developed by Google and adopted by its web services and clients — Chrome, mainly — it has finally been officially presented by IETF in the form of RFC 9000 - QUIC: A UDP-Based Multiplexed and Secure Transport1 on the 27th of May 2021. As of now, QUIC is implemented in modern browsers (Chrome, Firefox, Edge) and services (YouTube, Facebook, Uber) predominantly serving as a basis for HTTP/3.
It seems that QUIC is being expansively adopted on the Internet and is here to stay. So let’s have a look at the protocol, explore what it brings to the table, and see how we can use it in our applications. As in my previous posts, we will do that by building something. This time it’s going to be a chat application (because what the world needs is, of course, yet another chat application).
Before we do that, though, let’s take a step back and look at the big picture of the TCP/IP stack. Since the words “network programming” and “simple” don’t normally go hand in hand, I’ll be simplifying some concepts.
TCP/IP
From programming books or university courses, you might remember the OSI model of networking that divides communication between computers into 7 layers:
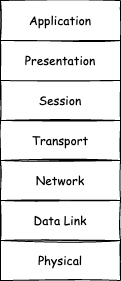
This model had been created in the 1970s, way before the Internet saw the light of day. The design of the protocols the Internet is built on, TCP/IP, does not strictly follow this model, though. Created around the same time, it gained critical mass in the 1990s when Microsoft incorporated it into Windows 95. TCP/IP also layers the stack into several parts — 4 instead of 7 — each responsible for handling transmitted data on a different computing level. If we were to map TCP/IP layers on OSI layers, the mapping would look like that:
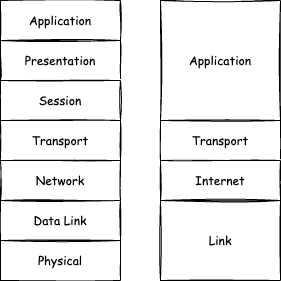
Let’s break the TCP/IP stack down layer by layer, going bottom-up:
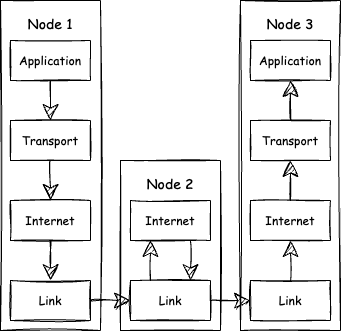
The link layer handles sending data between physical devices. That’s basically just ones and zeros flowing from one node to another.
The internet layer is responsible for routing packets between nodes over the networks. This layer tells the data that comes up from the link layer where to go next.
The transport layer that sits on top of the first two provides well-known TCP and UDP protocols, that stand for Transmission Control Protocol and User Datagram Protocol, respectively — we will talk about them in a moment. When working on this level, we, developers, are abstracted away from how data is actually being routed and transmitted over the network. The link and internet layers are still there doing their job, but on the transport level we don’t have to think about the specifics.
Finally, on the application layer we deal with, well, application-level protocols, such as HTTP or SMTP. These protocols decode data from bytes to something more meaningful for our applications, like JSON documents.
To understand how data flows from one node to another through the layers, we can illustrate it by the following diagram:
The picture of the stack wouldn’t be complete without the TLS protocol. Despite its name, Transport Layer Security, it sits between the transport and application layers, making sure data in transit is protected. On the sender’s side, it encrypts the data before passing it down to the transport layer. On the receiver’s end, TLS decrypts data coming from a transport protocol and sends it up to the application layer. TLS allows the client to authenticate the server, that is, to verify that the server is what the client thinks it is, and optionally allows the server to authenticate clients.
This is, of course, a fairly simplified picture of the TCP/IP stack, but it should give us an idea of how it works. Now, in the context of this post we are mostly interested in the transport layer, which is where QUIC operates. But before we proceed to it, let’s talk about TCP, UDP, and TLS.
TCP
When we make requests over the Internet, they normally travel through a bunch of networks connected via physical devices until they reach the destination server. With that many moving parts, failures may and do happen: packets get lost, networks are being congested, devices fail. TCP takes care of all that by ensuring that packets are delivered in the right order, retransmitting lost packets, and adapting the data transfer rate — in other words, it makes the connection reliable.
When a client wants to exchange data with the server, a TCP session has to be created first. Once created, it allows for sending a stream of data back and forth between the parties. The session starts with a three-way handshake:
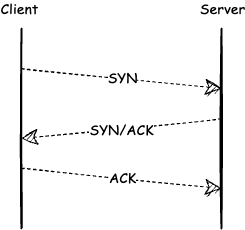
First, a client sends a packet with the SYN (synchronize) flag to the server that listens to incoming connections. The SYN packet provides the session’s details. Then the server replies with the ACK/SYN (acknowledgment and synchronize) flag. Finally, the client replies with an ACK.
When transmitting data through a stream, TCP uses a sequence number attached to each packet. The initial value is set during the handshake. The receiver uses this number to arrange the packets in the right order, to acknowledge receipt, and to send the acknowledgement back to the sender. The sender then checks if this acknowledgment number matches the one it sent and retransmits the packets with higher numbers.
Once the communication is done, a similar handshake is performed in order to close the session.
UDP
Unlike TCP that takes care of transmission reliability, the UDP protocol does not concern itself with it at all. UDP does not have sessions, delivery confirmation, or packet retransmission. When sending data over UDP, the sender doesn’t even know if the receiver is available. All UDP does is send packets to a specified destination. It is nevertheless a vital part of the stack and is widely used in certain scenarios, such as streaming or online multiplayer games.
The absence of all these features, however, makes UDP useful for when packet loss is tolerable and transmission speed is priority. Using UDP doesn’t mean we can’t reliably transfer data, though. We simply need to move ensuring reliability to an application layer protocol. For example, TFTP uses UDP as a transport protocol and implements some TCP features, such as packet acknowledgement and retransmission.
TLS
In the early days of the Internet, data was transmitted as is without any kind of protection. Effectively, any node between the client and server could potentially read it. Lately, when passwords and credit card numbers started floating around, it became quite a concern. This is when TLS, designed to provide communication security, gained popularity and wide adoption.
To establish a TLS connection the client and server negotiate the common parameters that are to be used during the session:
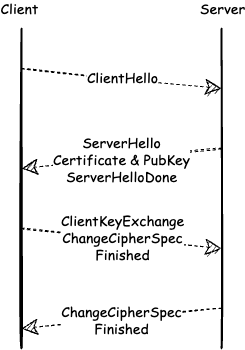
First, the client requests the server to establish a TLS session providing a TLS version, ciphers for the encryption, and the client’s public key. The server then replies with the cipher it’s going to use, its own public key, and a certificate indicating that the server is truly what the client thinks it is. Next, the client verifies the certificate with a certificate authority. The certificate is usually issued by an authority that both client and server trust, for example Let’s Encrypt. Both the client and the server have to derive a signature and message authentication code from each other’s public keys in order to verify the integrity of encrypted data. Once the handshake is performed, the client can start sending encrypted data to the server.
Problems
Both transport protocols, TCP and UDP, are really good at what they do. There are, however, a few problems with them, especially when it comes to how application protocols, HTTP in particular, use them.
A TCP session provides a bi-directional stream for sending data between the nodes. HTTP/2 is optimized for using a single TCP connection and allows for multiple concurrent HTTP transactions by multiplexing them over the stream. On the HTTP level, it might seem that the requests and responses are flying concurrently over a single TCP connection, but in reality they’re using one “physical” stream of data. (It can be thought of as a CPU sharing its time between multiple threads.) This situation, however, creates a head-of-line blocking problem. That is, if one packet belonging to a transaction gets lost, all transactions have to stop until that single packet is being retransmitted and acknowledged.
Another problem is possible protocol improvements and the Internet ossification. The Internet is essentially a network of networks, and those networks are full of devices that help transmit data, like routers, NATs, and gateways. If we wanted to make an improvement to TCP or UDP, all these devices would need to adopt it, which would probably take years.
In order to establish a single TCP and TLS session, a client should perform a number of round trips across the network. It’s not a problem per se, but wouldn’t it be nice to reduce it down to just one? Or even zero?
And here’s when QUIC comes to the rescue.
QUIC Protocol
QUIC is a transport protocol that’s built on top of UDP. It implements all the smarts for making the connection reliable and incorporates TLS 1.3 to ensure data security.
QUIC also addresses the problems from above. It introduces a concept of independent streams, so that if a stream’s packet gets dropped, other streams would continue to work. Unlike TCP and UDP that are implemented in kernelspace, QUIC is a userspace protocol, that is, it can be patched and can evolve at a much faster speed. Last but not least, it reduces latency by offering one- and zero-roundtrip handshakes. In other words, QUIC is, well, quick (I know, I know, everyone and their mother made this joke already, but I couldn’t resist).
During the QUIC handshake, a client sends an initial request containing all the data needed to establish a connection. The server replies with a response providing acknowledgement, a TLS certificate, and other information. Effectively, the connection is set, starting from the next request that would acknowledge server’s data the client can send the actual payload.

The new protocol brings more to the table than just solutions to the abovementioned problems. One of its interesting features is the concept of QUIC connections. Each QUIC connection has its own ID, so that if the underlying UDP address or port changes, the connection would live on by being assigned a new address or port. In practice, that means that if a device switches networks — say, it goes from Wi-Fi to LTE — an underlying UDP connection would be closed, but QUIC can continue working as if nothing happened by creating a new UDP connection and assigning it to the same QUIC connection.
All in all, QUIC works reliable, fast, and secure — kinda like… portals:
Now, let’s put our hands on the protocol and code a chat application in Go.
Building a Chat
Luckily, we don’t need to implement QUIC’s specification from scratch. There are many existing implementations for virtually any platform or language. In Go, QUIC has not gotten into the standard library (yet), but there’s a popular implementation quic-go written in pure Go that we can use for our needs.
Usually chat applications consist of a server and a client — well, many clients, actually. One client sends a message to the server, which broadcasts it to other clients, using a protocol that all parties understand. In a real system, we would probably stick to HTTP. However, since we are here to explore QUIC and want to use it directly, we are going to create our own protocol, or should I say “protocol”.
Normally, for a protocol we would define several types of messages, like login, logout, and whatnot. Each type would carry specific data, for example login might have a nickname attached to it. We will keep things as simple as possible, though, and define only one type of message:
type Message struct {
  Nickname string
  Text     string
}
Nickname is what a client calls itself and Text is the actual content of the message. When sending a message, the client may use different nicknames, but that’s okay for our purposes.
We would also have these convenient methods on Message for reading it from and writing it to a QUIC stream:
func (m *Message) Read(r io.Reader) error {
  return gob.NewDecoder(r).Decode(m)
}

func (m *Message) Write(w io.Writer) error {
  return gob.NewEncoder(w).Encode(m)
}
Luckily for us, quic-go’s Stream interface embeds both io.Reader and io.Writer, so we can just delegate encoding and decoding a message to Go’s gob package. Since QUIC provides independent streams, we can leverage it by using one stream for one message. It might not be obvious, but that actually simplifies a lot of things for us. If we were implementing this chat over TCP, we would have a problem with defining a message. As mentioned early, TCP provides one bi-directional stream of bytes, so it doesn’t have a concept of messages. A common solution for this is either to use a message delimiter or to prefix each message and its fields with a length.
Server
For the server part, we also need to define a struct:
type server struct {
  listener quic.Listener
  clients  map[string]quic.Connection
  messages chan Message
  mutex    sync.Mutex
}
Here we need a few things. First, a listener that’s going to listen for and accept incoming connections on a certain port. clients for keeping track of these connections: broadcasting new messages to them and removing the ones that are offline. A messages channel for sharing messages between receiving and broadcasting goroutines of the server. Finally, a mutex to protect the clients map while accessing it from different goroutines.
Essentially, we need two methods on the server: Accept and Broadcast. Let’s start with the Accept method first:
func (s *server) Accept(ctx context.Context) {
  for {
    conn, err := s.listener.Accept(ctx)
    if err != nil {
      log.Printf("[ERROR] failed to accept new connection: %v\n", err)
      return
    }

    go s.handleConn(ctx, conn)
  }
}
What it does is just block until a new connection is available. Once it’s there, we pass it down to handleConn spawning a new goroutine. If there’s an error in accepting connections or the context was canceled, we print an error and return from the method.
The handleConn method does all the heavy lifting for managing connections:
func (s *server) handleConn(ctx context.Context, conn quic.Connection) {
  defer func() { _ = conn.CloseWithError(serverError, "failed to handle connection") }()

  s.mutex.Lock()
  s.clients[conn.RemoteAddr().String()] = conn
  s.mutex.Unlock()

  log.Printf("[INFO] added client: %s\n", conn.RemoteAddr().String())

  for {
    stream, err := conn.AcceptStream(ctx)
    if err != nil {
      s.removeClient(conn.RemoteAddr().String())
      return
    }

    go s.readMessage(stream)
  }
}
First, as good citizens, we defer closing the connection. Then we add it to the clients map for broadcasting incoming messages from other connections. In the for loop we wait for messages from a client in a form of quic.Stream blocking until the stream is available. If things go south, say, a client had disconnected, we remove it from the map by calling removeClient, otherwise we proceed with spawning another goroutine, passing the stream down to the readMessage method, and waiting for another stream to come:
func (s *server) removeClient(addr string) {
  s.mutex.Lock()
  defer s.mutex.Unlock()

  if _, ok := s.clients[addr]; ok {
    delete(s.clients, addr)
    log.Printf("[INFO] removed client %s\n", addr)
  }
}

func (s *server) readMessage(stream quic.Stream) {
  defer func() { _ = stream.Close() }()

  var message Message
  if err := message.Read(stream); err != nil {
    log.Printf("[ERROR] failed to decode message: %v\n", err)
    return
  }

  s.messages <- message
}
Nothing fancy in both methods. In removeClient, we need to lock the mutex to protect modifying the clients from possible access from other goroutines. In readMessage, we defer closing the stream, try to read a message from it, and either print an error or pass the message to the messages channel.
Now let’s have a look at the second server’s method, Broadcast:
func (s *server) Broadcast(ctx context.Context) {
  for {
    select {
    case message := <-s.messages:
      s.mutex.Lock()
      for addr, client := range s.clients {
        go s.sendMessage(client, addr, message)
      }
      s.mutex.Unlock()
    case <-ctx.Done():
      return
    }
  }
}
Here, we wait for either a message popping up from the messages channel or the context to be canceled. While the latter case doesn’t do much — just exits the method — the former iterates over the clients map and calls sendMessage for each of them in a protected manner:
func (s *server) sendMessage(client quic.Connection, addr string, message Message) {
  stream, err := client.OpenStream()
  if err != nil {
    log.Printf("[ERROR] failed to connect to client %s: %v\n", addr, err)
    return
  }
  defer func() { _ = stream.Close() }()

  if err := message.Write(stream); err != nil {
    log.Printf("[ERROR] failed to send message to %s: %v\n", addr, err)
    return
  }
}
In this method, we just open a stream (again, not forgetting to close it at the end) and try to write a message to it. If any part of it returns an error, we just log it and bail out.
That’s essentially the whole server. Now let’s proceed to the client.
Client
Client’s code is somewhat similar, but slightly simpler compared to server’s code. First, we define a client struct that would incorporate a nickname and an instance of quic.Connection:
type client struct {
  nickname string
  conn     quic.Connection
}
On the client, we want to have two methods: Send for sending messages to the server and Receive for receiving them from the server. We start with the former first:
func (c *client) Send(text string) error {
  stream, err := c.conn.OpenStream()
  if err != nil {
    return err
  }
  defer func() { _ = stream.Close() }()

  message := Message{Nickname: c.nickname, Text: text}

  return message.Write(stream)
}
Similarly to the server’s sendMessage method, we open a stream and try to write a message to it. Unlike the server, though, we return an error to the caller, so it’s up to the caller to decide what to do with it.
The second method, Receive, is a bit more tricky:
func (c *client) Receive(ctx context.Context) (<-chan Message, <-chan error) {
  messages, errs := make(chan Message), make(chan error)
  go func() {
    defer close(messages)
    defer close(errs)
    for {
      stream, err := c.conn.AcceptStream(ctx)
      if err != nil {
        errs <- err
        return
      }

      go c.readStream(stream, messages, errs)
    }
  }()

  return messages, errs
}
First of all, we define two channels for returning messages and errors, as we don’t expect things to always go nice and smooth over the network. Then we spawn a goroutine for sending messages and errors to these channels, respectively, and immediately return both to the caller — it’s a common approach in Go for implementing the producer-consumer pattern. In the goroutine we just spawned, we wait for a stream to come and either: send an error to the errors channel and return, indicating a problem with the connection, or call the readStream method spawning yet another goroutine — and continue on waiting for more streams:
func (c *client) readStream(stream quic.Stream, messages chan<- Message, errs chan<- error) {
  defer func() { _ = stream.Close() }()

  var message Message
  if err := message.Read(stream); err != nil {
    errs <- err
    return
  }

  messages <- message
}
Client’s readMessage is, again, somewhat similar to the server’s method with the same name. First, it makes sure that the stream is going to be closed at the end. Then it tries to read a message from the stream. If that ended successfully, the message goes to the messages channel, popping in the caller’s code, otherwise an error takes a similar route.
Connecting Clients to the Server
With both the client and server implemented, let’s run them and see how the chat works. I hooked the client part up into a bubbletea app to make it look a bit nicer:
On the left pane we have the server showing who has connected, while on the right pane we have two clients talking to each other. Using a network inspection tool, like Wireshark, we can verify that both parties do indeed talk over QUIC and even explore individual packets.
Thanks to Tero Nurmiluoto for carefully reviewing the post and suggesting numerous improvements.
You can check out the code from this post on GitHub: quic-chat.
Further Reading
Along with supplement RFCs: RFC 8999 - Version-Independent Properties of QUIC, RFC 9001 - Using TLS to Secure QUIC, and RFC 9002 - QUIC Loss Detection and Congestion Control ↩︎